Writer Update: Sensitivity Labels / Unified Labeling has been deployed within M365 GCC. In turn, this article is out of date.
This guide is intended to outline a sample set of labels which can be utilized to allow email users to properly mark messages. This is accomplished utilizing Azure Information Protection (AIP) Labels.
At the writing of this guide, Unified Labeling has not been released with the Government Community Cloud (GCC). As a result, we are required to use AIP Labels. Upon the release of Unified Labeling, administrators will be able to leverage labels located within the Security and Compliance Center. That will allow the process to adjust to leverage new Sensitivity Labels.
However, this guide is, at present, focused on GCC deployments. The product group has released an article discussing when AIP will sunset and move to the Unified Label store within the Security and Compliance Center. As of the writing of this guide, Worldwide deprecation is scheduled for 31 March 2021. GCC deprecation is schedule for 12 months after Worldwide deprecation.
Announcing Timelines for Sunsetting Label Management in the Azure Portal and AIP Client (Classic)
Primary References:
- Azure Information Protection Client for Windows
- Azure Information Protection Client Download
- Azure Information Protection Custom Configurations
- Frequently Asked Questions – Azure Information Protection
- The Client Side of Azure Information Protection
- How to Configure Label Visual Markings for Azure Information Protection
Azure Information Protection Labels and Policy
Access the Azure Information Protection Administration Center
Begin by logging into the Microsoft Azure administration center and accessing the Azure Information Protection service administrative center.
There are two primary methods to locate the AIP administrative center.
Method 1: Perform a search:

Method 2: Select the Menu Icon in the upper left corner, and then select All Services:

Then, at the All Services screen, select the All Services Right Arrow:

Then scroll to Identity and select Azure Information Protection.

Create Azure Information Protection Labels
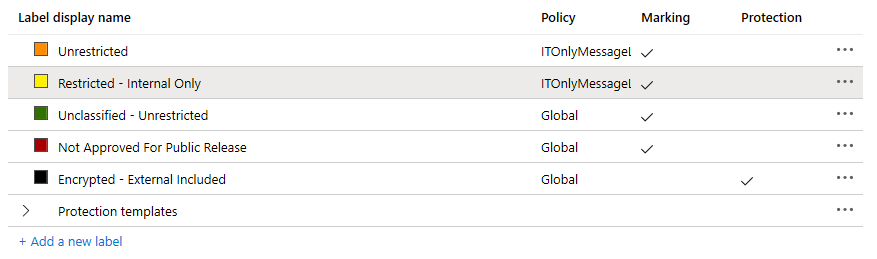
Upon accessing the AIP administration center, select Labels located under Classifications.
Then select Add a new label.

This will open the Label blade. The following is a sample configuration:
-
- Enabled = On
- Label Display Name = Unrestricted
- Description = Content has no restrictions. Content may be released to public.
- Color = Orange
- Set permissions for documents and emails containing this label = Not Configured
- Set Visual Marking (such as header or footer):
- Documents with this label have a header: Off
- Documents with this label have a footer: On
- Footer Content: The footer will contain additional information:
- Font Size: 11
- Header Color: Black
Unrestricted – Releasable Content
This message contains UNRESTRICTED information. It may be released to the public.
Reviewed by: ${User.Name} on ${Event.DateTime}
Note: The available variables which can be applied within the AIP Headers and Footers can be seen within the Microsoft article: How To Configure A Label for Visual Markings for Azure Information Protection.
Once properly configured, select Save.
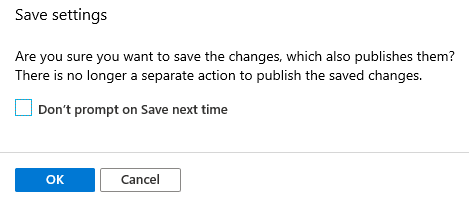
Note: A prompt will ask if you wish to save the changes, which also publishes them. This is important for already published labels as the changes which are being made would then be seen by users. However, new labels which have not been assigned by policy are not available to users. As a result, it is safe to publish these changes at this time.

Bonus Tip: The order displayed on the Labels screen is the same order which is displayed within the Outlook client. To control the display order, select the Ellipsis (three dots) next to the label, and select Move up.
Before:

After:
Azure Information Protection Label GUIDs
Azure Information Protection labels are identified by their GUID. The GUID is required to configure advanced settings both within AIP as well as within Exchange Online.
The GUID can be located by opening the AIP Label properties blade (just click on the label in AIP). Once the properties for the label appear, scroll to the bottom and you will see the GUID displayed:

Annotate the GUID for all the labels which were created. These will be required later in this guide.
Azure Information Protection Policies
Within the Azure Information Protection administration center, select Policies under Classifications, then select Add a new policy.

The Policy blade will open where the settings for the new policy are defined. The following are sample settings:
-
- Policy Name = ITOnlyMessageLabelTest_1Jan2020
- Policy Description = Internal Message Label Testing Policy for IT
- Select which users or groups get this policy. Groups must be email-enabled.
- For this lab I have created the IT Staff mail enabled security group.
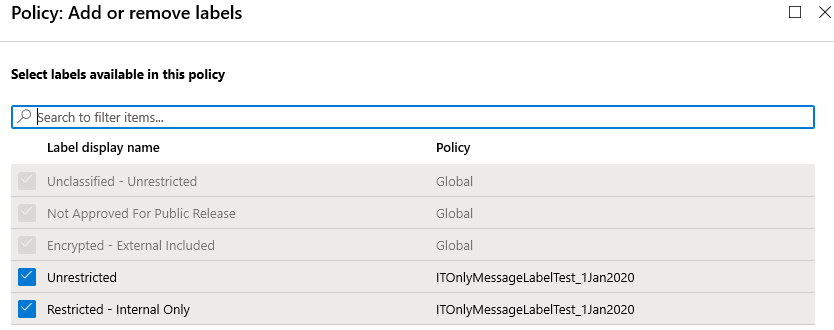
- Add or Remove Labels
- If labels are already published via the Global Policy, they will automatically appear within this new policy.
Select the default label: Select the label which the client should use as the default. It is recommended that this is configured to None to prevent the AIP client from automatically applying labels to all Office Documents unless that is the desired function.
Outlook will require a separate manually configured within Advanced Policy Settings. Ensure to select a label for this setting so that all other Office files have a default label.
Users must provide justification to set a lower classification label, remove a label, or remove protection = On
For email messages with attachments, apply a label that matches the highest classification of those attachments = Automatic
Display the Information Protection bar in Office apps = On
Make all necessary adjustments based on your environment.
Select Save when complete.

A message will appear advising that the changes made are to be published. This is expected and acceptable in that we have restricted this to a pilot group. When ready to deploy to all users, adjust which Users/Groups are the recipient of this policy, or create a new policy. Select OK.
Azure Information Protection Policies Advanced Settings
In addition to the standard settings which are made available when creating a new AIP Policy, there are also advanced configuration settings which must be manually configured. These settings can be managed both thru the GUI and PowerShell. In this guide, we will utilize the GUI for configuring advanced settings.
Critical Info: The Azure Information Protection client within Outlook will default to the first label with protection, despite what might have been configured previously while initially creating the policy. As a result, we must configure the default Outlook label via an advanced setting as shown below.
At the Azure Information Protection Policies screen, select the Ellipsis icon (three dots) at the right of the policy, then select Advanced settings.

The Advanced Settings screen will appear.
We need to set the default label that all Outlook Messages will utilize by default. In this sample, we are using the GUID of the Unrestricted label as the default. Add a new custom value with the following settings:
-
- Advanced Setting 1:
- Name: OutlookDefaultLabel
- Value: Label GUID
- Explanation: This is the GUID of the Label you wish to have as default in Outlook
- Advanced Setting 2:
- Name: OutlookBlockUntrustedCollaborationLabel
- Value: Label GUID
- Explanation: This is the GUID of the label which restricts message from being sent to external recipients
- Advanced Setting 3:
- Name: OutlookBlockTrustedDomains
- Value: Your SMTP Domains (Comma separated with no spaces)
- Explanation: These are the domains you truest to receive RESTRICTED information. Only domains listed here will be allowed to receive RESTRICTED Information. You must include both your public SMTP domain and your tenant’s <mydomain>.onmicrosoft.com domain name.
- Advanced Setting 1:

Once complete, select Save and close.
Download and Install the Azure Information Protection Client
The download link for the Azure Information Protection client was provided within the Primary References section located at the start of this article.
At the download site, select Download.
When prompted to select which client to download, select the version with a Major Version Number of 1. Take note, if you plan to deploy the client centrally, select the appropriate central deployment installer.
Note: This version is considered the classic client. It is scheduled to be deprecated as of March 31, 2021. See Azure Information Protection Client for Windows.

Proceed to install the client onto any workstation for the pilot.
Validating Labels
Now that the Azure Information Protection client has been installed on your lab workstation(s), its necessary to validate that the labels and rules are functioning correctly.
Begin by opening the Microsoft Outlook client.
Next, create a New Message.
At the top of the message we should see the assigned AIP label. If properly sized, additional labels will appear. The assigned label should correspond to the GUID of the label previously configured within the AIP Policy.

You should also see the Protect button within the message. If selected it will display all the AIP labels published to the logged in user.

Note: If necessary, you can configure the AIP Policy to hide the bar from the top of the message.
- Run thru a set of baseline scenarios to validate that each label is functioning correctly:
- Send an Unrestricted message to both internal and external recipients.
- Send a Restricted message to internal only recipients.
- Send a Restricted message to external only recipients.
- Send a Restricted message to both internal and external recipients.
- Review the senders sent items.
Message Sent Unrestricted – Header and Footer Added Automatically:

Message Sent Restricted – Header and Footer Added Automatically:

Attempting to send a message to any recipient who’s SMTP domain is not in the OutlookBlockTrustedDomains list results in the following alert when the user attempts to send the message:

Based upon our AIP Policy, emails with attachments which have a RESTRICTED AIP Label would automatically apply the same label to the email. As a result, the user would receive the following alert automatically if they attempted to send restricted information to an organization not within the OutlookBlockTrustedDomains list.