This guide was written previously in another role and had been published via the TechNet Gallery. While it is still located there, I decided that I would also make it available here for those who might want to create a AD CS lab. Understand, this guide is really just a lab and an introduction to issues which you may need to consider. You’ll need to customize the configuration for any production environments.
Windows Server 2016 Active Directory Certificate Services Lab Build – Part 2
Windows Server 2016 Active Directory Certificate Services Lab Build – Part 3
This guide does not utilize a Capolicy.inf file for configuration. However, the following articles discuss these in greater detail. If you are planning a PKI deployment which is on a larger scale, utilizing this config file might be very useful.
Root CA Build Guide
Lab Servers
ROOTCA01: Offline Root CA; Workgroup Member
INTCA01: Online Issuing CA; Domain Member
Note: The information provided in this guide is intended to help you get started with a basic PKI infrastructure for issuing certificates to domain joined machines. It is not a fully comprehensive guide. Each organization will have unique requirements which must be accounted for and incorporated into their own PKI. This guide is intended as a basic introduction establishing a foundation for future PKI expansion and use.
Step 1 – Standalone Root CA Initial Installation
Begin by building the standalone Root CA. This machine will not be domain joined. Install the Active Directory Certificates Services – Certification Authority Role.

After the Certificate Authority role has successfully installed, the server must then be configured. Within the Server Manager console, we will now see a post configuration task action item to complete. Select the action icon next to the notification flag at the upper right and select Configure Active Directory Certificate Services on the destination server.

We will then be greeted with the AD CS Configuration screen for the Offline Root CA. Let’s proceed through the wizard to finalize the post installation items for the server.
Credentials: We will be using the built in local administrator account. This is due to the fact that the server is an offline root CA. This means that it is not domain joined and therefore only has local accounts. Select Next at this screen to proceed.

Role Services: At the Role Services screen we must now identify which of the various role services to use. For the offline root CA, we will use Certification Authority.
![AD CS Configuration
Role Services
Credentials
Role Services
Setup Type
CA Type
Private Key
Cryptography
CA Name
Validity Period
Certificate Detebese
Confirmation
FesL'ts
DESTINATION SERVER
Select Role Services to configure
g] Certification Authority
C) Certification Authority Web Enrollment
Online Responder
Network Device Enrollment Service
C) Certificate Enrollment Web Service
C) Certificate Enrollment Policy Web Service
More about AD CS Server Roles
Configure
Cancel](http://infotech360.com/wp-content/uploads/2020/05/ad-cs-configuration-role-services-credentials-r.png)
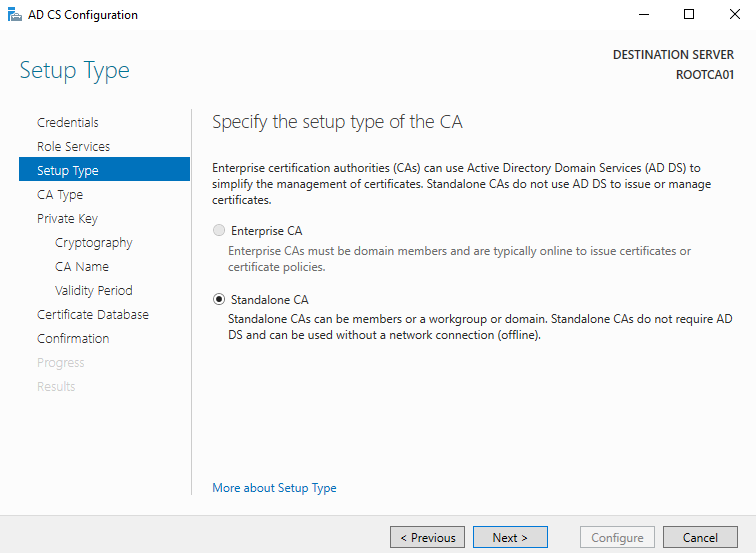
Setup Type: At the Setup Type screen we will select Standalone CA. Again, we are selecting this option as it is an offline root CA. By definition, the Enterprise CA must be a member of an Active Directory domain. Since our offline root CA is only a member of a workgroup it is impossible for it to be an Enterprise CA.
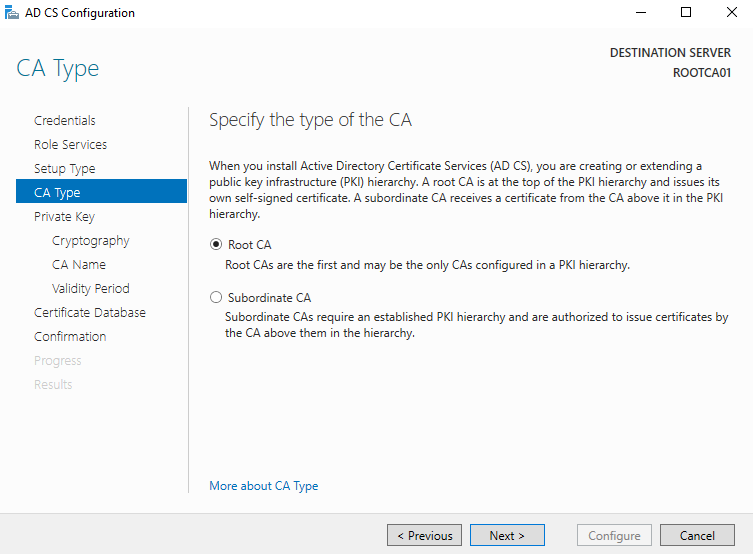
CA Type: For CA Type we will select Root CA. This is self-explanatory due to the type of CA which we are setting up.
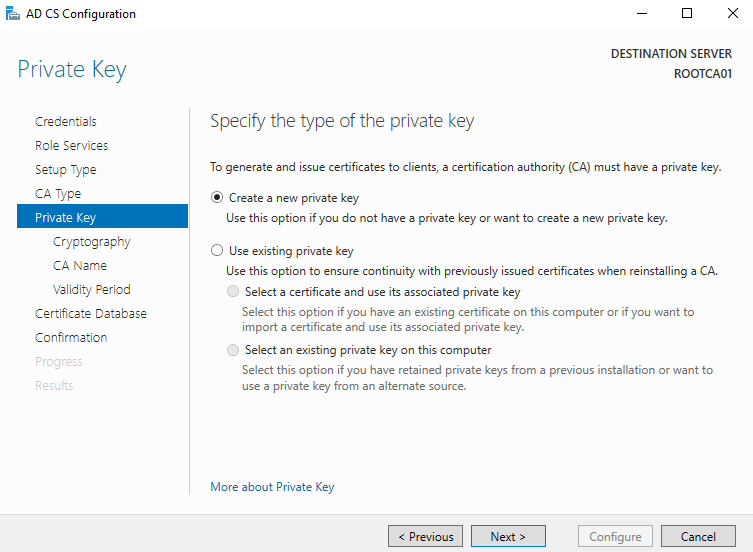
Private Key: Since this is a new deployment, we will utilize the Create a new private key option. Utilization of an existing private key is outside the scope of this guide.
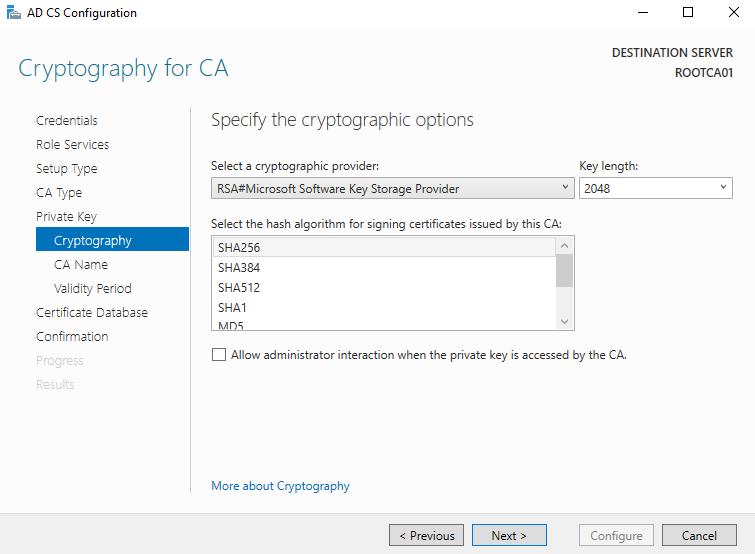
Cryptography for CA: We need to use a minimum of SHA256. A critical takeaway here is to avoid using SHA1, MD5, MD4, or MD2. These cryptographic algorithms are older, weaker, and have shown signs of compromise in the past. You must select the appropriate cryptographic provider, key length, and hash algorithm for your deployment. See the following post to learn more about cryptographic providers:
For this deployment we, will utilize:
- Cryptographic Provider: RSA#Microsoft Software Key Storage Provider
- Key Length: 2048 (Increasing to 4096 in CY2020 and beyond would likely be wise)
- Hash Algorithm: SHA256
At the time of writing this guide, these meet all public requirements. However, as a CA administrator/engineer, ensure that you keep track of current developments regarding acceptable PKI implementations.
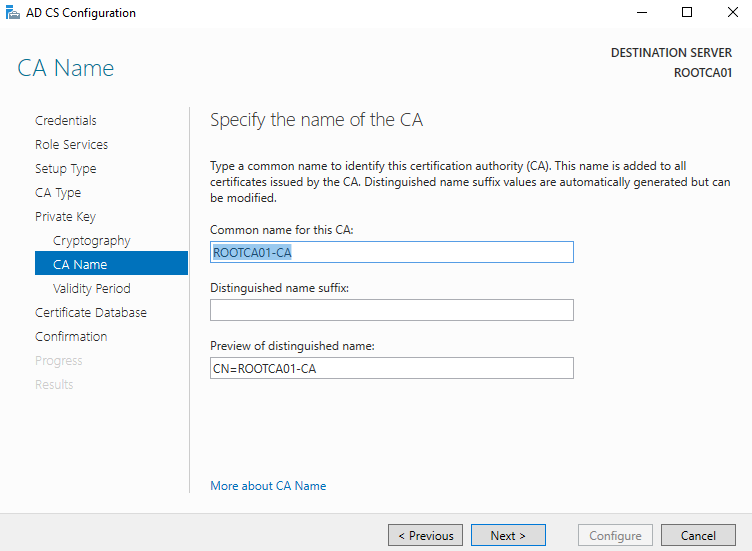
CA Name: For the offline root CA, we will utilize the default naming context. However, if you require your offline root CA to have another common name, provide it at this screen.
Validity Period: The validity period for the certificate which will be generated for the offline root CA is dependent upon your organizational requirements. For the purpose of this guide, and due to the fact that this build exists within a lab, I have opted to use 20 years. However, in a real-world scenario there are additional considerations and constraints that factor into making this determination:
-
-
- It is recommended that you consult with a local Cyber Security technician to determine if there is an established recommendation/guideline/requirement for this setting.
- The shorter the validity, the sooner you’ll have to issue a new CA chain.
- The longer the validity, the higher the probability that the chain can be compromised.
- If you anticipate that the root CA will be replaced/upgraded in the future, plan to keep the validity period for at least 1 year after that projected date. This allows you some flexibility within your upgrade project to ensure that your root CA’s certificate does not expire prior to implementing a new CA chain with a new root CA.
-

CA Database: We must now specify the path for the CA database. Considering that this is an offline root CA, utilizing the default location is likely acceptable. Since this CA should only issue certificates to intermediate CA’s on a very irregular basis, the drive on which the DB and Logs reside do not need to be high performance drives.
- Pro Tip: I always recommend that any system that homes a DB, and thus transaction logs (TLOGS), have a dedicated drive for the DB and a separate dedicated drive for the TLOGS. However, each scenario must be evaluated to determine if this is necessary. Systems with low IO do not mandate this. However, systems with high IO should be configured with this at a minimum. Additionally, if the system is a virtual machine, each of these drives should utilize a dedicated storage controller for each drive; sharing a single storage controller can result in poor performance even with dedicated drives.
- Example:
- C: = System Drive with OS and Programs
- D: = Database Drive
- T: = Transaction Log Drive

Confirmation: We have now arrived at the Confirmation page. This is the final screen prior to implementing the configuration for the offline root CA. Validate that the settings on this page are accurate, correct, and sustainable. Once we configure the offline root CA, it will be difficult, if not impossible, to make changes. If all the settings are correct select Configure.

Progress: The Progress screen should briefly appear as the CA is configured. It should then proceed to the Results screen.
Results: At the Results screen, we should receive Configuration Succeeded. If any other result was received, review the output for the configuration transaction and make the necessary corrections. Specifics are outside the scope of this guide.

Step 2 – Standalone Root CA Certificate Export
Having performed the initial Root CA setup, we now have some specific action items that we must take for the offline root CA post setup. Let’s start by exporting the offline root CA’s certificate. This will be required for a couple of items later as we setup the Intermediate CA and the Certificate Trust Chain within Active Directory Domain Services.
- Within Server Manager, select Tools, then select Certification Authority.
- We should now have the Certificate Authority snap-in open.
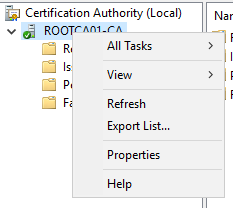
- Right-click the certification authority name, and select Properties.
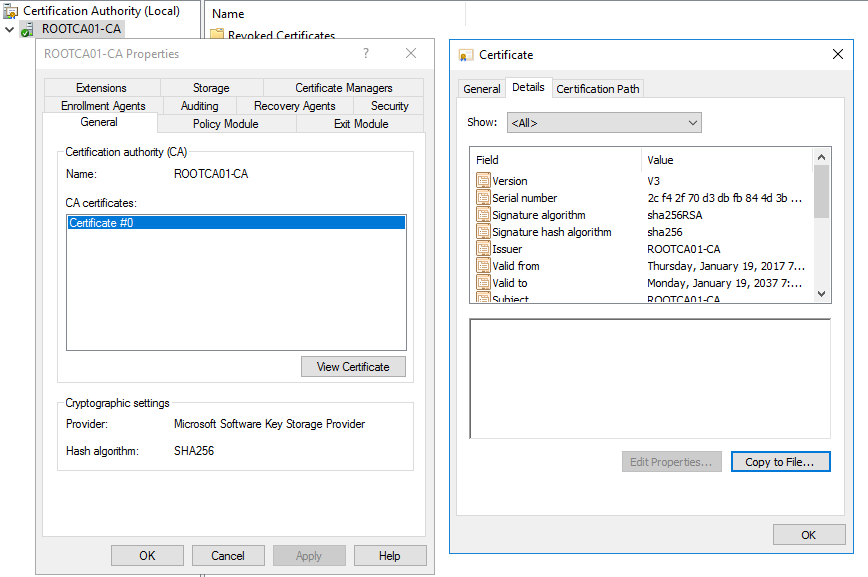
- We are now presented with the ROOTCA01-CA Properties window.
- On the General tab, we will see the offline root CA’s certificate. Select View Certificate.
- Then select the Details tab.
- Then select the Copy to file radio button. This will allow us to export the offline root CA’s certificate. This certificate is required to establish and deploy the trusted root chain within the Active Directory domain. This is addressed later in this guide.
Certficabon Path
Auditing
Recovery Agents Security
Pohcy Module
Certification authority (CA)
ROOTCAOICA
CA certificates
‘Catificat±
V’ew Certificate
Crypt ographic settings
Ver sion
Signature algorithm
Signature hash algorithm
avalid from
ovalid to
Hash algorithm
Microsoft Software Key Storage Provider
SHA256
2c f4 2f70 d3db 84 3b
sha256RSA
ROOTCAOI-CA
Thursday, January 19, 2017 7.
Monday, January 19, 2037
Cop,’ to File… “>
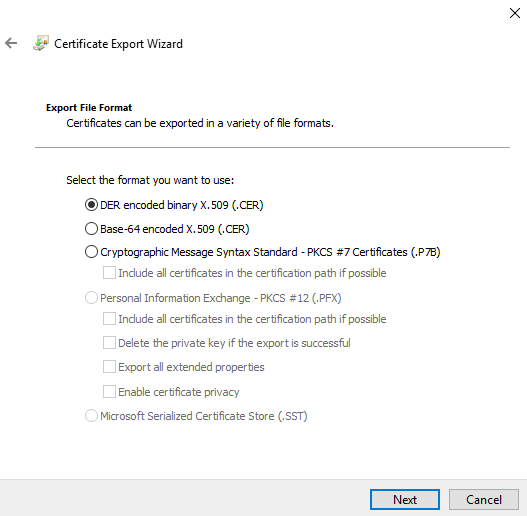
Welcome to the Certificate Export Wizard: We are now presented with the certificate export wizard which will guide us through exporting the offline root CA’s certificate. This wizard will allow us to save the certificate in a .CER format which we will later use to distribute within the Active Directory domain. At this screen select Next.

Export File Format: We need to export the file in a DER encoded binary X.509 (.CER) format. For trust chain establishment and distribution, we do not require any additional values of the offline root CA’s certificate.
File to Export: Specify the file name. In other words, identify the path to which we need to save the .CER file along with the name that we are going to assign to the .CER file.
- Pro Tip:
- Create a folder on the server, such as C:\Software, which you can utilize for saving files which you need to retain. Some admins create a folder called C:\Temp. I leave this to your discretion within your organization. However, having a common path on all servers for this purpose is valuable. This ensures that all administrators are saving data into non-profile specific locations. This becomes extremely valuable in specific scenarios which at present are beyond the scope of this guide.
- Utilize Value Added File Names. As an example, for the offline root CA, I would name the exported certificate file as ServerName_Date_VersionNumber.cer. See the screenshot for a graphic example. By doing so, we ensure that we clearly understand what this file is. Certificate naming format is critical. As you begin to deal with many certificates over an expanding period-of-time, having a sustainable and easily understood naming context will greatly simplify your work. Extend this same naming framework to the Friendly Name for certificates.

Completing the Certificate Export Wizard: This screen will validate all the prior options for exporting the certificate. Select Finish.
Step 3 – Standalone Root CA Security Configuration
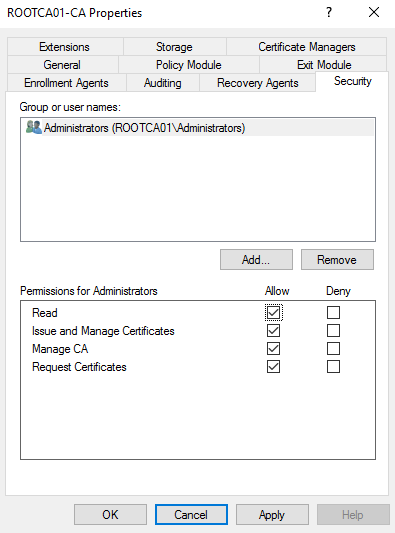
By default, the Root CA provides more permissions than we would like to see. While this is a stand-alone CA, and not joined to a domain, let’s take an easy step to slightly bump security up.
On the Security tab of the root CA’s properties window, let’s remove the Everyone group. Complete this by Selecting the Everyone group and then selecting Remove.
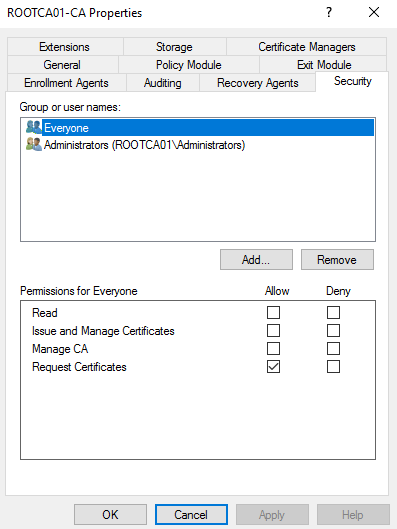
We should be left with simply Administrators within the Security tab. Let’s select Allow Read and Allow Request Certificates.
Auditing: ALL EFFECTIVE SECURITY POSTURES INCLUDE AUDITING. Auditing is a critical component of security. Without auditing, we have no effective means to view historical transactions. In respect to our topic, enabling an effective auditing policy is required. Auditing provides us a method by which we can see the historical behavior on our systems. Let’s review some caveats:
- First, this is an offline root CA. Auditing it provides insights into the actions which occur on the CA. However, we will be challenged to export the audit data from this server. In your environment you may want to consider how you plan to export, and SECURE, the audit data from the offline root CA. The audit data alone is valuable to an enterprise adversary in that it provides insight into your infrastructure. Protect your logs.
- As a stop gap, I strongly recommend that you identify a means within your environment to track when the offline root CA is powered on/modified. That is to say, if the offline root CA is a virtual machine, how have you secured the virtual machine to prevent export and exfiltration of the VM itself and ensure that that data within the VM is encrypted and secure? HOW ARE YOU SECURING YOUR VIRTUAL INFRASTRUCTURE? This is a critical question that expands beyond the scope of this guide and into the enterprise services scope, such as Active Directory Domain Services, as well as other critical infrastructure services (think DNS, DHCP, etc.). If the machine is a physical machine, what physical safeguards are in place to secure the CA?
Closing the Gap: Why did we perform this? First, we are eliminating the possibility of any user other than an offline root CA administrator from performing functions against the offline root CA. Second, we are ensuring that administrators on the offline root CA are not inhibited from performing their tasks. I recommend that you review the built-in Administrators security group of the offline root CA to validate that there are not any unauthorized members within this group.
Security Consideration: The offline root CA is the base/root/core of the PKI trust chain. If the root CA is compromised then the entire chain has been compromised and in turn, every certificate which has been issued within the root CA’s chain is therefore compromised and no longer valid. This means that every certificate must be revoked, an updated certificate revocation list (CRL) must be published, and every certificate must be replaced with a new certificate from a new certificate chain. In a large organization this could theoretically be impossible, not to mention the financial implications of this. Protect the Root CA. Let me say that one more time. PROTECT THE ROOT CA!
At the time of writing this guide, the following article had been published:
Securing PKI: Planning a CA Hierarchy
I highly recommend that you review the details and guidance provided within this publication. PKI is one of the most critical components of any enterprise. Failure to properly secure and protect the PKI can, and likely will, result in a security incident.
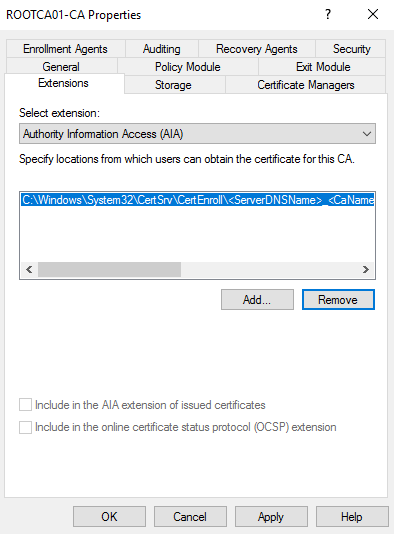
Step 4 – Standalone Root CA Extensions and Properties
After finalizing the post deployment tasks, the location for the CRL Distribution Point needs to be configured. We can store this data in two places. First, we can store it within Active Directory by importing the CRL into the LDAP CDP. The second location is on the Intermediate CA within its CDP. We will configure both.
Target Configuration –
CRL Distribution Point (CDP) Extension:
- C:\Windows\System32\CertSrv\CertEnroll\<CaName><CRLNameSuffix><DeltaCRLAllowed>.crl
-
- Publish CRLs to this location
- Publish Delta CRLs to this location
-
- ldap:///CN=<CATruncatedName><CRLNameSuffix>,CN=<ServerShortName>,CN=CDP,CN=Public Key Services,CN=Services,CN=Configuration,DC=srv,DC=lab<CDPObjectClass>
-
- Include in all CRLs. Specifies where to publish in Active Directory when publishing manually.
- Include in the CDP extension of issued certificates.
-
- http://intca01.srv.lab/CertEnroll/<CAName><CRLNameSuffix><DeltaCRLAllowed>.crl
-
- Include in CRLs. Clients use this to find Delta CRL locations.
- Include in the CDP extension of issued certificates.
-
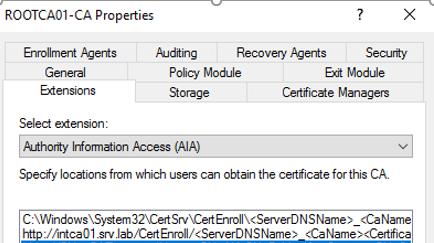
Authority Information Access (AIA) Extension:
- C:\Windows\System32\CertSrv\CertEnroll\<ServerDNSName>_<CaName><CertificateName>.crt
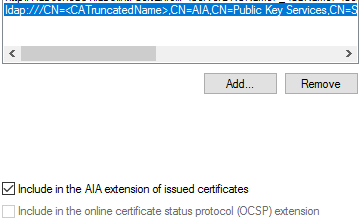
- Ldap:///CN=<CATruncatedName>,CN=AIA,CN=Public Key Services,CN=Services,CN=Configuration,DC=srv,DC=lab<CAObjectClass>
- Include in the AIA extension of issued certificates
- http://intca01.srv.lab/CertEnroll/<ServerDNSName>_<CaName><CertificateName>.crt
-
- Include in the AIA extension of issued certificates
- Critical Note: There is an underscore “_” between <ServerDNSName> and <CaName>. That is not visible with the hyperlink.
- Without Hyperlink “…CertEnroll/<ServerDNSName>_<CaName>…”
-
Notes: If you intend of utilize a highly available HTTP CDP location then you may use a DNS name that will be configured in a load balanced array or DNS Round Robin configuration for both the HTTP CDP and AIA extensions.
Why might I wish to do this?
Not everything that utilizes a CA may be able to query LDAP. In turn, the CDP and AIA information should be available to clients that instead will utilize HTTP.
Field Feedback: Why is the CDP and AIA HTTP location not secured with SSL?
I’ve been asked this a few times. Let’s first establish what the HTTP CDP (CRL Distribution Point) location is doing. Its use is to validate the revocation status of certificates. A client will connect to the CDP to validate that a certificate assigned to a service it is attempting to access is valid. If the CDP location were secured with SSL then the client would then have to validate the CDP HTTP service’s certificate. However, it would not be able to as the CRL is within the HTTP CDP path. This in turn would result in revocation failing.
Well, why not use an external CA with an external CDP location to validate the HTTP CDP SSL certificate status?
You would not want to do this. It means that you must rely on a third party for you and others to validate your PKI, thus allowing a third party to interfere with your established PKI. Additionally, that would be over HTTP as well. Finally, the data that we are transferring through calls to the CDP does not require protection. We want it to be public and accessible.
If you would like to read further about configuring HA for the HTTP AIA and CDP Repositories the following blog is a good start:
Also, if you intend to use your PKI to issue certificates which will be used for externally available services, such as services located within the DMZ, you will need to consider how you plan to setup an external CDP or OSCP Responder. That is beyond the scope of this guide.
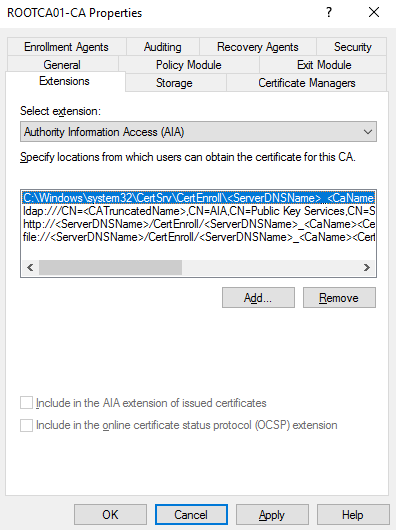
Begin by opening the Certification Authority MMC Snap-in. Once opened right click the CA and select Properties. At the Root CA properties window select the Extensions tab.
By default we are presented with the following:
 /Cert Enroll/
Let’s remove everything except the file path. We are doing this as this is going to be an offline Root CA. The path defined in the last two values will not be valid as the server is offline.
We should be left with the following settings:
![ROOTCAOI-CA Properties
Enrollment Agents
Select
Auditing
Reco very Agents
Security
Policy Module
Storage
Certificate Managers
CRL D,stnbution (CDP)
Specify Bcations from which users can obtain a certificate revocation list
(CRL)
:CRLName Sufi
Z] Publish CRLs to this location
Include in all CRIs Spacifias where to publish in the Active Directory
whan publishing manual'"
Include in CRA Clients use this to find Delta CRL locatione
Include in the CDP of issued certificates
Z] Publish Delta CRLs to this location
Include in the IDP of issued CRLs](http://infotech360.com/wp-content/uploads/2020/05/rootcaoi-ca-properties-enrollment-agents-select-1.png)
Now, we need to add the path to the CDP located on the Intermediate CA. (We will build that CA later in this guide.) For our purposes, the Intermediate CA’s name will be INTCA01.SRV.LAB. Therefore, the path will be:
- http://intca01.srv.lab/CertEnroll/<CaName><CRLNameSuffix><DeltaCRLAllowed>.crl
Note: We are able to add this path on the Intermediate CA due to the fact that we are also going to install the Web Enrollment role service on the Intermediate CA server. However, if you opt to separate the web enrollment role service onto another machine, you will need to use a valid path to that machine. Alternatively, this path can be any valid internal web address. It does NOT have to be located on the Intermediate CA, we’re just opting to do that in this lab scenario.
If you would like to read further about configuring HA for the HTTP AIA and CDP Repositories the following blog is a good start:
Add the path by selecting the Add radio button.
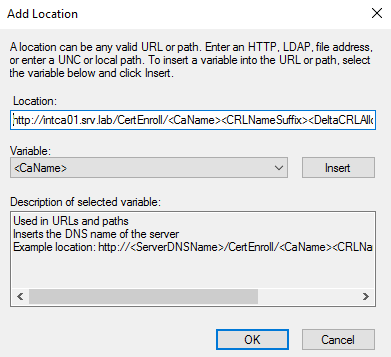
Select Ok once completed.
Once we have returned to the Root CA Properties screen, and we are still on the Extensions tab, update the new path to include:
- Include in CRLs. Client use this to find Delta CRL locations.
- Include in the CDP extensions of issued certificates.
We must also add the LDAP path. We are going to perform this manually as we want to also publish the CRL into Active Directory.
- ldap:///CN=<CATruncatedName><CRLNameSuffix>,CN=<ServerShortName>,CN=CDP,CN=Public Key Services,CN=Services,CN=Configuration,DC=srv,DC=lab<CDPObjectClass>
- Include in all CRLs. Specifies where to publish in the Active Directory when publishing manually.
- Include in CRLs. Clients use this to find Delta CRL locations.
- Include in the CDP extension of issued certificates.
![ROOTCAOI-CA Properties
Enrollment Agents
Select
Auditing
Reco very Agents
Security
P olicy Module
Storage
Certificate Managers
CRL Distribution (CDP)
Specify Bcations from which users can obtain a certificate revocation list
(CRL)
htt V,fintcaCI srv
Ida tCRLNameSuffte.CN= (ServerSh01tNal
Publish CRLs to this location
Z] Includa in all CRA Specifies where to publish in the Active Directory
when publishing manually
Z] Include in CRLs Clients use this to find Delta CRL locations
Z] Includa in tha CDP a&nsion of issued certificates
Publish Delta CRLs to this location
Include in the IDP of issued CRLs](http://infotech360.com/wp-content/uploads/2020/05/rootcaoi-ca-properties-enrollment-agents-select-2.png)
We now need to add a new location for the Authority Information Access (AIA). On the extensions tab under Select Extension:, ensure that the Authority Information Access (AIA) extension is selected.
 /CertEnroII/
fila
Include in the AIA of issued certificates
Include in the Qnline certificate status protocol (OCS?) “>
Now, again, let’s remove all paths except the file path location so that we are left with the following:
We now need to add the path to the AIA locations:
- http://intca01.srv.lab/CertEnroll/<ServerDNSName>_<CaName><CertificateName>.crt
- Remember, there is an underscore “_” between <ServerDNSName> and <CaName>.
- Include in the AIA extension of issued certificates.
- Ldap:///CN=<CATruncatedName>,CN=AIA,CN=Public Key Services,CN=Services,CN=Configuration,DC=srv,DC=lab<CAObjectClass>
- Include in the AIA extension of issued certificates.
If you wish to validate that you have configured the CRT path name correctly, browse to C:\Windows\System32\CertSrv\CertEnroll. There you will find the CA’s CRT file:
![Home
CertEnroII
Share
View
o
Windows
Name
E]
Syste m32
CertSrv
CertEnroII
OTCA01-CA.crl
Date modified
1/25/2017 10:53 AM
1/19/2017 7:57 PM
Search CertEnroII
Type
Certificate Revocation List
Security Certificate
Size
* Quick access
Desktop
Downloads
Documents
[e] Pictures
Softwa re
This pc
Network
2 items
ROOTCAOI
ROOTCA01-CA.crt](http://infotech360.com/wp-content/uploads/2020/05/home-certenroii-share-view-o-windows-name-e.png)
Now, we must update the CA’s CRL publication interval. We perform this by right-clicking the Revoked Certificates node and selecting Properties.

Update the CRL Publication Interval to an appropriate length of time for your environment.
Notes: The offline root CA should only be brought online when it is necessary to renew or issue new certificates for the issuing CAs. This means that you should not have a short publication interval. If your publication date expires without publishing a new CRL from the CA then CRL checks for any certificate issued by the Root CA will fail. In this lab, we will configure the interval for 1 year. This means that within 1 year I must bring this CA back online and publish a new CRL. This setting can be easily changed.
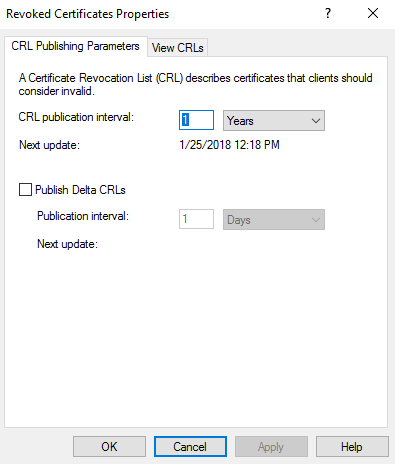
Delta CRLs are published in between CRL publications. For the offline root CA this should not be necessary as we will ALWAYS publish a new CRL when we issue/revoke certificates from the offline root CA.
We must now publish the CRL. Right click the Revoked Certificates node and select All Tasks and then Publish. At the Publish CRL screen select New CRL and then select Ok.
- The CRL is located at C:\Windows\System32\CertSrv\CertEnroll.


![Machine generated alternative text:
Home
CertEnroII
Share
View
o
Windows
Name
E]
Syste m32
CertSrv
CertEnroII
OTCA01-CA.crl
Date modified
1/25/2017 10:53 AM
1/19/2017 7:57 PM
Search CertEnroII
Type
Certificate Revocation List
Security Certificate
Size
* Quick access
Desktop
Downloads
Documents
[e] Pictures
Softwa re
This pc
Network
2 items
ROOTCAOI
ROOTCA01-CA.crt](http://infotech360.com/wp-content/uploads/2020/05/machine-generated-alternative-text-home-certenro.png)
Now, copy the contents from C:\Windows\System32\CertSrv\CertEnroll to the same location that the exported Root CA certificate was saved from Step 2 of this guide. Copy the all three items to the Intermediate CA.
- Root CA CRT File
- Root CA CER File
- Root CA CRL File
![Home
Softwa re
Share
View
o
This PC Local Disk Software
Name
ROOTCAOI ROOTCA01-CA.crt
C] ROOTCAOI CA.crl
RootCA01 CA 19Jan2017 vi.cer
Date modified
1/19/2017 7:57 PM
1/25/2017 12:25 PM
1/19/2017 8:48 PM
Sea rch Software
Type
Security Certificate
Certificate Revoca...
Security Certificate
Size
* Quick access
Desktop
Downloads
Documents
[e] Pictures
CertEnroII
Softwa re
This pc
Network
3 items](http://infotech360.com/wp-content/uploads/2020/05/home-softwa-re-share-view-o-this-pc-local-dis.png)
Step 5 – Standalone Root CA Issuance Term
By default, the Root CA will issue certificates for 1 year only. This creates an issue in that the subordinate CA certificate will be restricted to 1 year. In turn, this means that the subordinate CA can never issue a certificate which is older than its own. Ultimately, this is not ideal in that it will result in a high rate of turnover of certificates via expiration and re-issuance.
The two keys in the registry that we are specifically interested in are:
- HKEY_LOCAL_MACHINE\SYSTEM\CurrentControlSet\Services\CertSvc\Configuration\<CAName>\ValidityPeriod
- HKEY_LOCAL_MACHINE\SYSTEM\CurrentControlSet\Services\CertSvc\Configuration\<CAName>\ValidityPeriodUnits
To resolve this issue, we must extend the issuance term of the root CA. We can perform this by utilizing the certutil command. This command is built into Windows Server and no additional software/feature is required.
First, let’s review what the settings are to begin with. We can do this at the administrative command prompt.
- Run the following command to determine the current value for the issuance length. We can see in the example below that the value is 1. This period is too short for our use so we will increase this.
Certutil -getreg ca\validityperiodunits

- The following command will allow us to see the type of time used to determine the validity duration. We can tell from this output that the time is measured in years and therefore does not require a change.
Certutil – getreg ca\validityperiod

- Run the following command to increase the validity period. In this lab I am increasing the period to 5 years.
Certutil -setreg ca\validityperiodunits 5

Note: You should restart the CA server.
We are now ready to begin work on the Subordinate CA build. See Part 2 for a guide on this.
2 thoughts on “Windows Server 2016 Active Directory Certificate Services Lab Build – Part 1”
Comments are closed.