Welcome back! This is Part 2 of the AD CS Lab Build guide. If you haven’t seen Part 1 yet, I recommend giving it a review. This is about the midway point of the deployment. As a result, there is critical information in Part 1 leading up to this.
Windows Server 2016 Active Directory Certificate Services Lab Build – Part 1
Windows Server 2016 Active Directory Certificate Services Lab Build – Part 3
This guide was written previously in another role and had been published via the TechNet Gallery. While it is still located there, I decided that I would also make it available here for those who might want to create a AD CS lab. Understand, this guide is really just a lab and an introduction to issues which you may need to consider. You’ll need to customize the configuration for any production environments.
Subordinate CA Build Guide
Lab Servers
ROOTCA01: Offline Root CA; Workgroup Member
INTCA01: Online Issuing CA; Domain Member
Note: The information provided in this guide is intended to help you get started with a basic PKI infrastructure for issuing certificates to domain joined machines. It is not a fully comprehensive guide. Each organization will have unique requirements which must be accounted for and incorporated into their own PKI. This guide is intended as a basic introduction establishing a foundation for future PKI expansion and use.
Step 6 – Subordinate CA Initial Installation
Note: To stand up the Enterprise Subordinate CA, the account used to perform the install must be a member of the Enterprise Administrators group.
Begin by building the subordinate CA. This machine will be the intermediate CA which will be used to issue certificates to machines within the Active Directory domain. Install the Active Directory Certificates Services – Certification Authority role service as well as the Certificate Authority Web Enrollment role service.
In respect to the machine’s name, ensure that it is sustainable and will not require any modification. Once the role has been installed you will not be able to change its name.
Pro Tip: Ensure that your naming conventions are meaningful and can stand the test of time. Remember, this is likely not the last time you will setup a server performing this function. Therefore, ensure that the next server in line can easily be brought into the naming context allowing for a consistent management approach.
Notes: In some environments it is best to install the Certification Authority Web Enrollment role service on separate dedicated machines. If additional security is required to segregate the CA from the web traffic required for Web Enrollment, consider doing this. However, this determination will need to be made locally based on local security requirements and guidance.
On the Subordinate CA server (INTCA01) install the following Roles and Role Services:
Role: Active Directory Certificate Services
Role Services:
- Certification Authority
- Certification Authority Web Enrollment
Begin by installing the Active Directory Certificates Services role within Server Manager. No additional features should be added – allow the defaults to remain in place.

At the role services screen, ensure to select Certification Authority & Certificate Authority Web Enrollment. You will be prompted to accept the addition of the IIS role and services. Select Add Features. Finally, select Next.
![Add Roles and Features Wizard
Select role services
Select the mle services to install for Active Directory Certificate Services
Manage
Tools
View
DESTINATION SERVER
INTCAOI
Role Services
Role services
Certification Authority
Certificate Enrollment Policy Web Service
Certificate Enrollment Web Service
Certification Authori Web Enrollment
Network Device Enrollment Service
Online Responder
Description
Certification Authority Web
Enrollment provides a simple Web
interface that allovvs users to
perform tasks such as request and
renew certificates, retrieve certificate
revocation lists (CRLs), and enroll for
smart card certificates.
Cancel
Add Roles and Features Wizard
Add features that are required for Certification
Authority Web Enrollment?
You cannot install Certification Authority Web Enrollment unless the
following role services or features are also installed.
Web Server (IIS)
Management Tools
IIS 6 Management Compatibility
IIS 6 Metabase Compatibility
[Tools] IIS Management Console
Web Server
Application Development
ISAPI Extensions
Common HTTP Features
Default Document
Directory Browsing
Include management tools (if applicable)
Add Features
Cancel
TASKS](http://infotech360.com/wp-content/uploads/2020/05/add-roles-and-features-wizard-select-role-service-2.png)

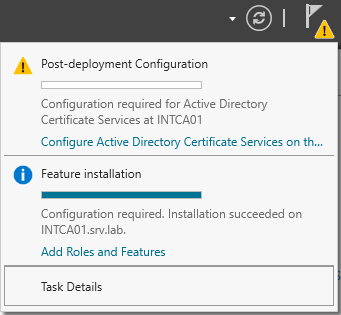
After the role has been installed, complete the post deployment tasks. Proceed through the remaining windows and select to Install the role and all necessary features.
We must now complete the post deployment tasks associated with having installed the CA. In the top right of Server Manager we should see a notice for action. Select Configure Active Directory Certificate Services option.
We will be presented with the AD CS Configuration Credentials screen which will require that an Enterprise Admin user is provided:

At the Role Services screen, select to configure both Certification Authority & Certification Authority Web Enrollment.
![AD CS Configuration
Role Services
Credentials
Role Services
Setup Type
CA Type
Private Key
Cryptography
CA Name
Validity Period
Certificate Detebese
Confirmation
DESTINATION SERVER
INTCA01srv.lab
Select Role Services to configure
g] Certification Authority
g] Certification Authority Web Enrollment
C) Online Responder
Network Device Enrollment Service
C) Certificate Enrollment Web Service
C) Certificate Enrollment Policy Web Service
More about AD CS Server Roles
Configure
Cancel](http://infotech360.com/wp-content/uploads/2020/05/ad-cs-configuration-role-services-credentials-r-2.png)
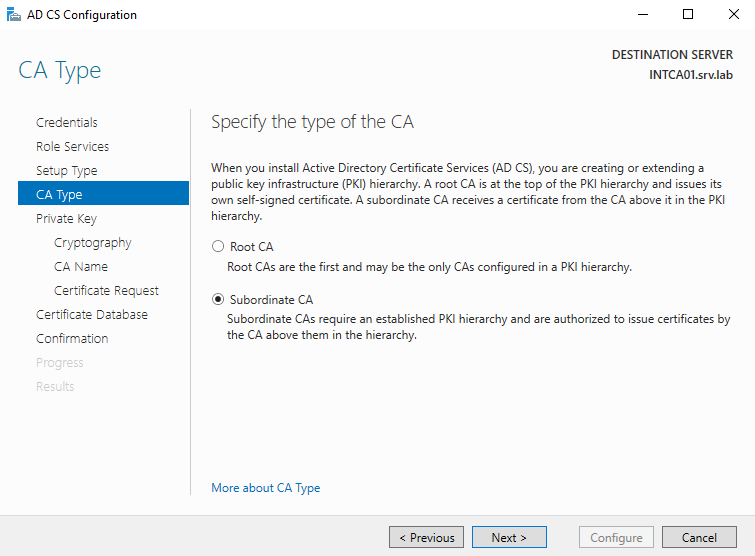
This server is going to be an Enterprise CA.

This server is going to be a Subordinate CA. It will be a subordinate of the offline Root CA.
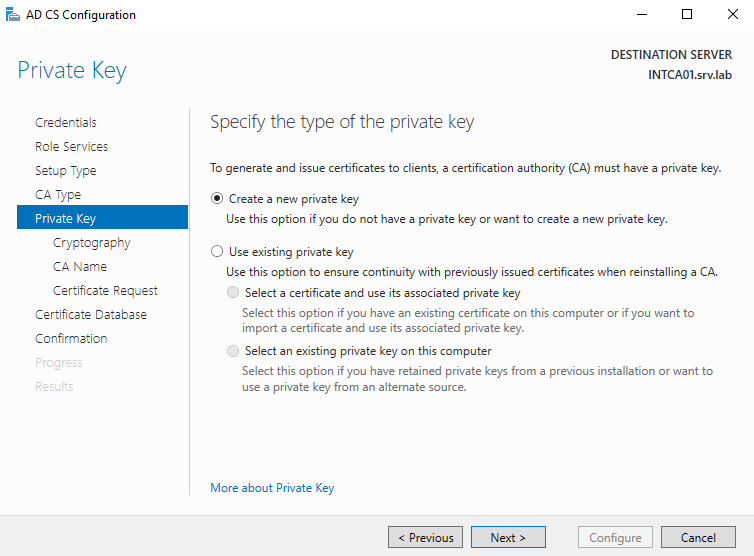
This server will require a new private key.
For this deployment, the CA will require a minimum of SHA256.

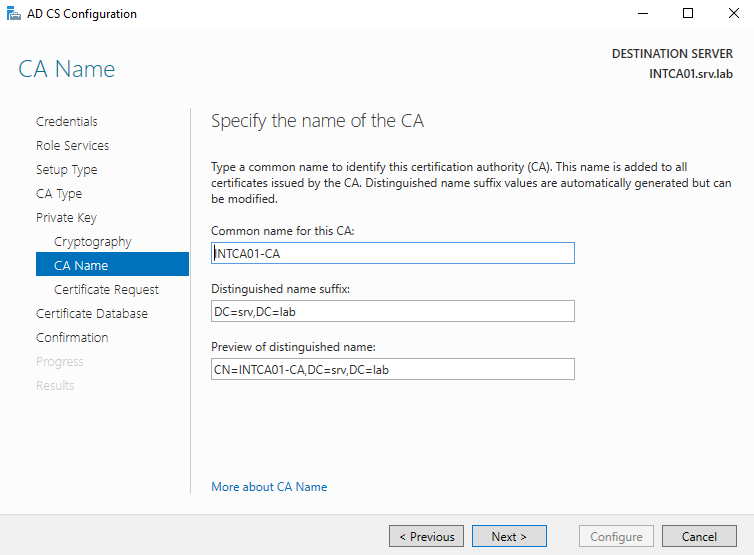
At the Specify the name of the CA, determine if you need to modify the name. For this lab I have removed the “srv-” (Domain NETBIOS Name) text from within the CA name.
At the Certificate Request screen, we are going to save a file to send to the offline root CA. In this case we must use a request file due to the root CA being offline. If the root were online, we could send the file directly to it.
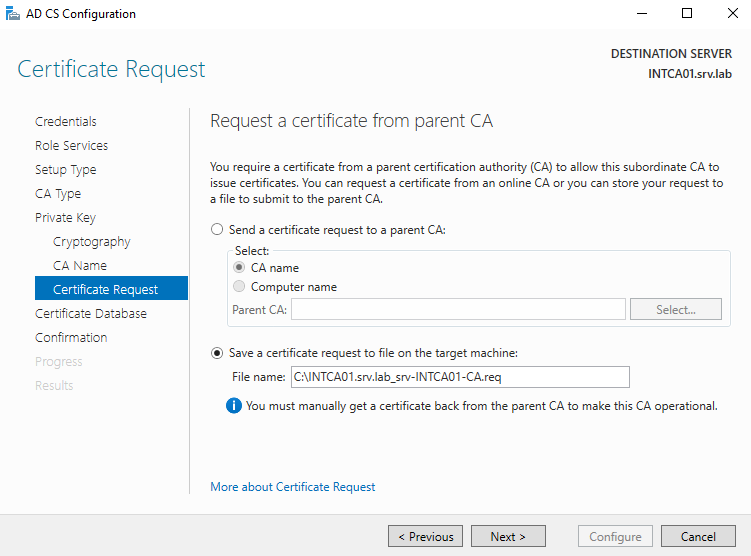
On the CA Database screen validate the path to which the DB and Logs need to be installed. On systems that are going to receive a high demand, it is recommended to consider providing a dedicate drive for both the DB and Logs. If the machine is virtual, provide a dedicate virtual SCSI controller to each of the drives.

At the Confirmation screen validate all the settings are correct and then select Configure.
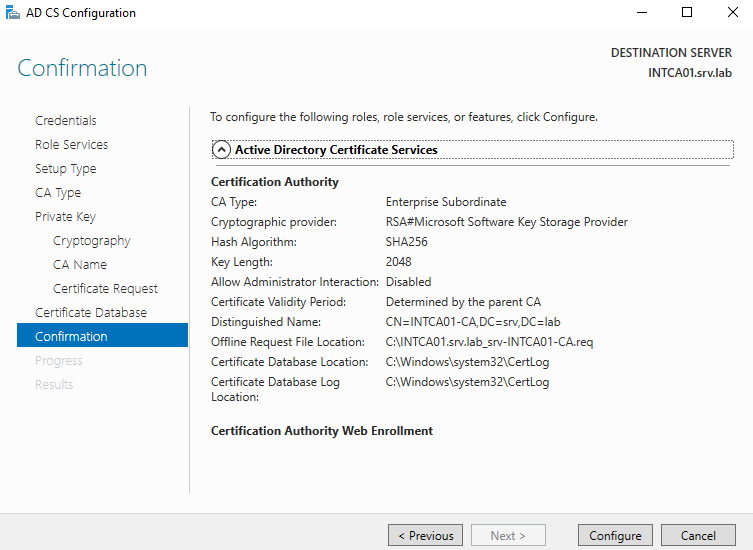
You should see the following screen then appear to configure the server:

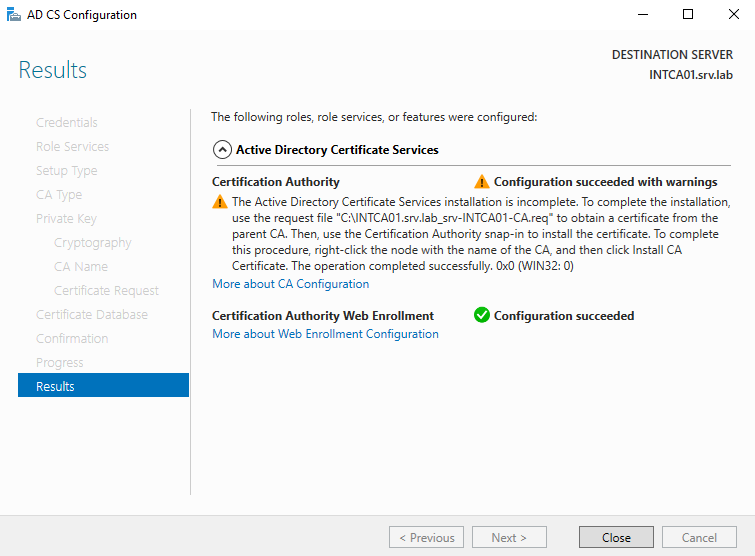
The Results page should display. Take note of the location where the certificate request (.REQ) file was saved. This file is required to move to the offline root CA to complete the intermediate certificate request. At this point, we can select Close.
Step 7 – Issue the Subordinate CA Certificate
To complete this step we must move the certificate request file from the intermediate CA to the offline root CA. After having moved it, continue with the guided steps below.
We will begin by opening the Certification Authority manager from Server Manager. Once it is open, right click the Root CA, select All Tasks, then select Submit New Request.

We will be prompted to browse and provide the request file from the intermediate CA. Locate the file and select Open.
![Open Request File
Organize •
DATA ALL (8)
New folder
Name
INTCAOI
Search INTCAOI
Date modified
1/25/2017 3:43 PM
* Quick access
Desktop
Downloads
Documents
[e] Pictures
CertEnroII
Softwa re
This pc
Network
Type
REQ File
File name:
INTCAOI .srv.lab srv-INTCA01-CA req
INTCA01.srv.Iab so.-INTCAOI CA.req v
Request Files r.req; txt; *.cmc v
Open
Cancel](http://infotech360.com/wp-content/uploads/2020/05/open-request-file-organize-data-all-8-new-f-1.png)
The request will now be pending in the Pending Requests node. Right click the request, select All Tasks, then select Issue.

- The new certificate will now be located within the Issued Certificates node. That certificate should have a validity period of the number of years that was defined within Step 5 of the Root CA Build.
- We must now copy the issued certificate to a file and move it to the intermediate CA. You can perform this by double-clicking the certificate and then on the Details tab, select Copy to file. Proceed through the wizard to copy the certificate to a file and then move it to the intermediate CA. Copying the file in .P7B format is required. Ensure that you select Include all certificates in the certification path if possible.
- We must also issue a new CRL. Perform this by right clicking the Revoked Certificates node and selecting Publish. Ensure that the CRL is copied to the intermediate CA as well.
Having moved the intermediate CA’s certificate to that machine, let’s now complete the certificate install. Within the certification authority management console, right click on the CA, select All Tasks and then select Install CA Certificate.

Within the wizard browse to the location of the P7B file copied from the offline root CA and select Open.
- You will receive an error stating that the revocation of the certificate cannot be validated at this time because the CDP offline. This is expected at this step. We have not placed the CRL from the offline root CA into the CDP yet. We will perform this step next. Select Ok to proceed through the error.
Copy the offline root CA’s CRL and the .CRT certificate file to the CDP location on the intermediate CA. This is the CDP location which we defined within the CDP extension on the offline root CA. See Step 4 from the Root CA Build guide.
C:\Windows\System32\CertSrv\CertEnroll
Return to the Certification Authority management console on the intermediate CA, right click the CA, select All Tasks, then select Start Service. The CA should now come online.

Step 8 – Configure the Intermediate CA Extensions
The intermediate CA has predefined extensions, the same as the offline root CA had. Updating these extensions is required to ensure that devices which are unable to query via LDAP can perform an HTTP CRL validation check. Fortunately, this is a simple step as we do not have to make any additions, but rather enable options. If clients require checking using SMB then the file extension may be required. Evaluate the requirements within your environment to determine if this extension is required.
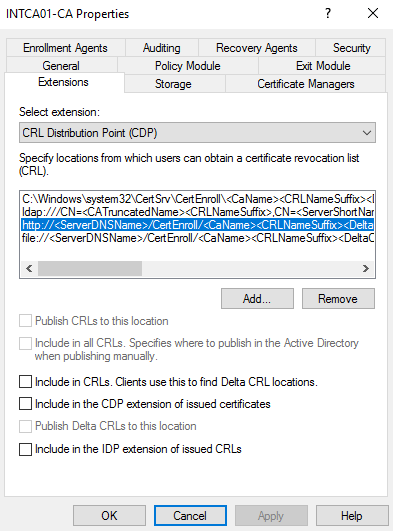
Within the Certification Authority management console, open the properties for the CA, and select the Extensions tab. Ensure that the CRL Distribution Point (CDP) extension is selected, and then highlight the default http extension, as shown below:
 /Cert Enroll/
Place a check in the following two options, and then select Apply. Select Yes when prompted to restart the AD CS service.
- Include in CRLs. Clients use this to find Delta CRL locations.
- Include in the CDP extension of issued certifications.
 /Cert Enroll/
Next, we need to include the additional AIA location. Change the extension type to Authority Information Access (AIA) and select the http extension as shown below:
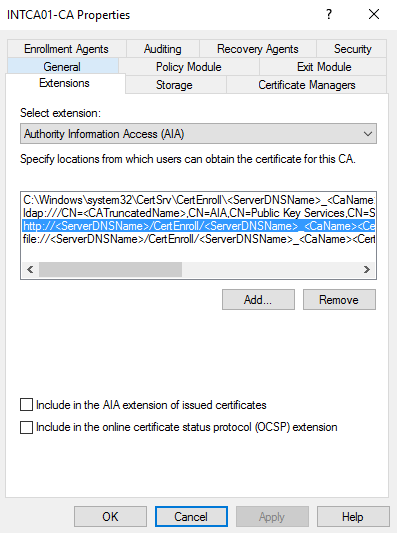
Place a check in the Include in the AIA extension of issued certificates option and then select Apply. Select Yes when prompted to restart the AD CS service.
![INTCAOI CA Properties
Enrollment Agents
Select
Auditing
Reco very Agents
Security
P ohcy Module
Storage
Certificate Managers
Authority Information Access (AA)
Specify locations from which users can obtain the certificate for this CA
C & Nama
Ida
Services .CN=S
htt :CaNameXC
file
Z] Include in the Al A e&nsion of issued certificates
Include n the online certificate status protocol (OCS?)](http://infotech360.com/wp-content/uploads/2020/05/intcaoi-ca-properties-enrollment-agents-select-5.png)
Intermediate CA Post Installation Tasks
Having completed the basic setup of the intermediate CA, we now have a few items that we should address.
- Review the auditing configuration of the CA. Enable auditing on the Auditing tab.
- Review the Security settings for the CA. By default, the CA may provide additional permissions that some environments may not wish to allow.
- Define the Enrollment Agents for the CA. This is not necessary, but recommended.
- Define the Certificate Managers for your organization.
- Remove all default published certificates. Complete this on the Certificate Template node within the Certification Manager console. You can complete this by selecting the templates, right clicking, and selecting Delete. Don’t worry, you’re just removing the publication from the CA. The Template itself is stored in Active Directory and we’re not deleting those.
Why would I want to delete the published templates? Best practice is to duplicate the default templates, customize the duplicate, and then publish it. Additionally, we don’t want to publish templates that we don’t intend to use.
AD Certificate Services PKI Configuration
Lab Servers
ROOTCA01: Offline Root CA; Workgroup Member
INTCA01: Online Issuing CA; Domain Member
Note: The information provided in this guide is intended to help you get started with a basic PKI infrastructure for issuing certificates to domain joined machines. It is not a fully comprehensive guide. Each organization will have unique requirements which must be accounted for and incorporated into their own PKI. This guide is intended as a basic introduction establishing a foundation for future PKI expansion and use.
Step 9 – Load Offline Root CA Certificate and CRL to Active Directory
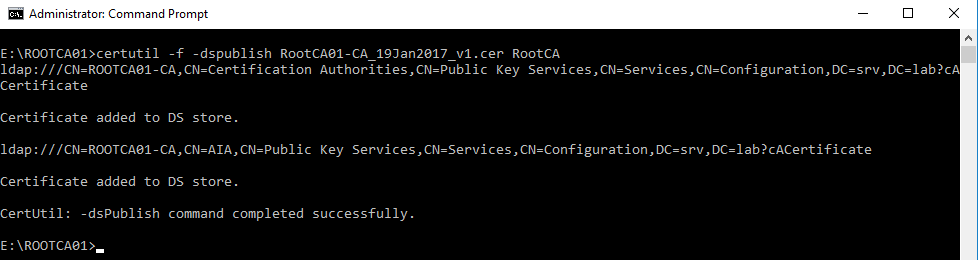
We must now load the offline root CA’s certificate into Active Directory. We will utilize the CERTUTIL command to complete this step.
On the intermediate CA, open an administrative command prompt. Browse to the location where the offline root CA’s .CER file is and execute the following command to load the certificate into Active Directory:
Certutil -f -dspublish <OfflineRootCA.CER_FileName> RootCA
Certutil -f -dspublish RootCA01-CA_19Jan2017_v1.cer RootCA
 _ “>
_ “>
At the same administrative command prompt, execute the following command to load the CRL into Active Directory:
Certutil -f -dspublish <OfflineRootCA.CRL_FileName> <RootCA Short Name>
Certutil -f -dspublish ROOTCA01-CA.crl ROOTCA01
 “>
“>
Note: I have seen where an error might occur during the publication of the Offline Root CA CRL into Active Directory: “LDAP_NO_SUCH_BOJECT”. This is due to the fact that the Offline Root CA container is not created within the CDP container. You must ensure that the Root CA Short Name is included in the command, otherwise you may receive this error. The command will create the correct container within the Active Directory configuration partition.
To validate that the PKI is configured correctly, open the Enterprise PKI mmc snap-in on the intermediate CA. It may take a moment to open. Once it does, there should not be any red. If you receive errors review the specific issue and reference this guide to resolve them.
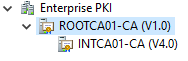
Next, right click Enterprise PKI and select Manage AD Containers. You should find:
- The Intermediate CA certificate populated into the NTAuthCertificates container.
- The Intermediate CA and the Root CA certificates populated into the AIA container.
- The Intermediate CA and the Root CA CRLs and Delta CRL within the CDP container.
- The Root CA certificate within the Certification Authorities container.
- The Intermediate CA certificate within the Enrollment Services container.
You may also view this via ADSI Edit. Open ADSI Edit and connect to the Configuration Partition:
![Connection Settings
Name: Configuraton
Path:
LDAP : //DCO I. srv lab 'Configuraton
Connection P oint
o
Select or type a Distinguished Name or Naming Context:
@Select a nell known Naming Context:
Configuration
Compu ter
o
Selector type a domain or server: (Server I Comain [port])
@Default (Domain or server that pu logged in to)
use SSL-based Encryption](http://infotech360.com/wp-content/uploads/2020/05/connection-settings-name-configuraton-path-ld-1.png)
Browse to the following path:
Configuration > CN=Configuration,DC=srv,DC=lab > CN=Services > CN=Public Key Services
![Machine generated alternative text:
v 2 ADSI Edit
v Configuration [DCOI .srv.lab]
DisplaySpecfiers
CN=Extended Rights
CN=ForestUpdates
CN=LostAndFoundConfig
CN
NTDS Quotas
Partitions
CN=PhysicaI Locations
CN=Services
CN=AuthN Policy Configuration
CN=CIaims Configuration
CN=Group Key Distribution Service
CN=Microsoft spp
MsmqServices
NetServices
CN=PubIic Key Services
CN=AIA
CN=CDP
CBI: Certificate Templates
Certification Authorities
Enrollment Services
CN=KRA
CN=OID
CN=RRAS
CN=Shadow Principal Configuration
CN=Windows NT
CN=Sites
CN=WeIIKnown Security Principals](http://infotech360.com/wp-content/uploads/2020/05/machine-generated-alternative-text-v-2-adsi-edit-1.png)
That wraps up this part of the guide. We’ll continue with certificate distribution in Part 3.
Did you miss Part 1?
2 thoughts on “Windows Server 2016 Active Directory Certificate Services Lab Build – Part 2”
Comments are closed.