Welcome back. This is Part 3 of the AD CS Lab Build guide. If you haven’t seen Part 1 or Part 2 yet, I recommend giving it a review. We’re almost done with our lab deployment of AD CS. As a result, there is critical information in Parts 1 & 2 leading up to this.
Windows Server 2016 Active Directory Certificate Services Lab Build – Part 1
Windows Server 2016 Active Directory Certificate Services Lab Build – Part 2
This guide was written previously in another role and had been published via the TechNet Gallery. While it is still located there, I decided that I would also make it available here for those who might want to create a AD CS lab. Understand, this guide is really just a lab and an introduction to issues which you may need to consider. You’ll need to customize the configuration for any production environments.
Lab Servers
ROOTCA01: Offline Root CA; Workgroup Member
INTCA01: Online Issuing CA; Domain Member
Note: the information provided in this guide is intended to help you get started with a basic PKI infrastructure for issuing certificates to domain joined machines. It is not a fully comprehensive guide. Each organization will have unique requirements which must be accounted for and incorporated into their own PKI. This guide is intended as a basic introduction establishing a foundation for future PKI expansion and use.
Distribute the Root CA Certificate for Trust
At this point, we must distribute the Root CA certificate to all machines within the domain as a trusted Root CA. This is necessary so that all clients will trust the entire certificate chain. There are two methods to perform this function.
Method 1 – Utilize a GPO to distribute the certificate.
To complete this method, select/create an appropriate GPO and add the certificate to the GPO for distribution.
This is located at: Computer Configuration > Policies > Windows Settings > Security Settings > Public Key Policies > Trusted Root Certification Authorities
At the Trusted Root Certification Authorities node within the GPO, right click the node and select Import, then browse to the Root CA’s certificate and select it.
Method 2 – Utilize Certutil to load the certificate into the Certification Authorities Container in Active Directory.
To complete this method, open an administrative command prompt and ensure that the working folder is C:\Windows\System32.
Utilize the following command to install the Root CA’s certificate (this should already be located on the Intermediate CA as it was copied earlier in the process to install):
Certutil -f -dspublish <cert_file_name> RootCA
Certutil -f -dspublish C:\Software\RootCA\RootCA01_cert.cer RootCA
You can verify that this method was successful by using the Enterprise PKI MMC snap-in. At the very least, this should be opened to determine if there are any old CA’s which should be removed from this AD container.
- On the Intermediate CA, add the Enterprise PKI snap-in to MMC.
- Once it is open, it will immediately fail to connect to the Root CA. This is expected.
- Right click the Enterprise PKI node and select Manage AD Containers.
- Select the Certification Authorities Container
- The Root CA certificate should appear in this container
- If there are any invalid certificates loaded in this store they should be removed
Considerations:
- The advantage to using a GPO is twofold. First, it is easily repeatable and takes very little in depth knowledge to perform. Second, it allows for targeted deployment of the certificate.
- The advantage to installing the Root CA certificate in the Certification Authorities Container is that it is distributed to every member of the domain without regard to GPO. This ensures that even machines which block inheritance receive this certificate.
- Finally, if you perform both of these methods, the certificate will appear twice in the certificate store on any machine which receives the root certificate via GPO as well. This does not hurt anything. In both cases, if an administrator removes the certificate it will be re-installed on the machine.
- It is recommended to select only one method and proceed with distributing the Root CA certificate within the domain.
At this time, the Root CA may be shut down and disconnected from the network.
Security Considerations:
- Physical access to the Root CA, (virtual or physical machine) constitutes full control of the certificate chain. The machine should be highly protected.
- Ensure that the username and password have been safely stored. It is recommended that the password is not used in any other location and is stored in a safe with restricted access.
Create and Publish Certificate Templates
There are two locations to manage certificate templates:
First, Within the Certification Authority Certificate Templates node. This is where you publish certificate templates. However, you DO NOT modify the template in this location. Deleting a template from this location simply means that it is no longer published. However, the template itself is not deleted.
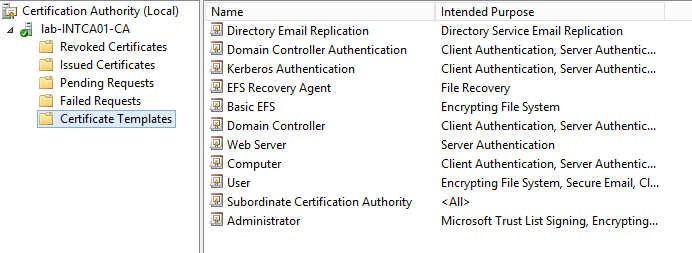
Second, the Certificate Templates Console. This is where you modify the certificate templates themselves. This is also where you can delete a template. You can get to the Certificate Templates Console from the Certification Authority Console by expanding the tree and right clicking Certificate Templates and selecting Manage.


Operating rule: Always Duplicate a template for publishing. Do not use the default templates that are pre-populated within the Certificate Templates Console. You cannot modify the default templates that are provided and therefore are unable to customize the templates to your needs.
Let’s start by reviewing the certificates which are already published. As a practice, do not publish certificate templates that you do not intend to use. Remove all published templates from within the Certification Authority Templates node by right clicking the template and selecting Delete.
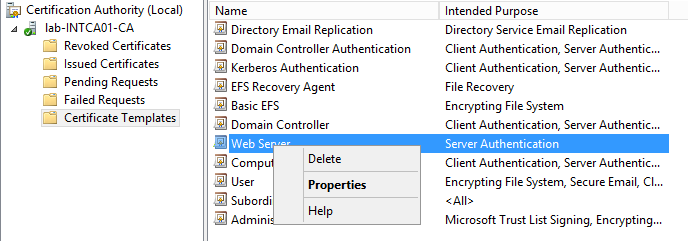
After deleting the published template, browse to the Certificate Template Console. You will see that the template is still there. This is because the template itself was not deleted, only that it is no longer published through the CA.
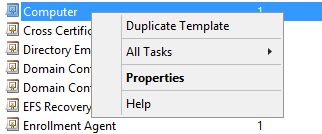
Within the Certificate Templates console, duplicate the following templates:
- Computer
- Domain Controller
- Domain Controller Authentication
- Workstation Authentication
- Web Server
Right click the template and select Duplicate:
Lab Duplicate Template Names:
- Published Remote Desktop Authentication v1
- Published Domain Computers v1
- Published Web Server v1
- Published Workstation Authentication v1
- Published Domain Controller Authentication v1
- Published Domain Controllers v1
I recommend that you include within the name of the template an identifier that specifies that the template is published and what version it is. If you don’t do this, it will become difficult to troubleshoot certificate issues in the future.
Once the duplicate template properties page comes up, select the General Tab and provide a valid name. Example: Published Domain Computers v1
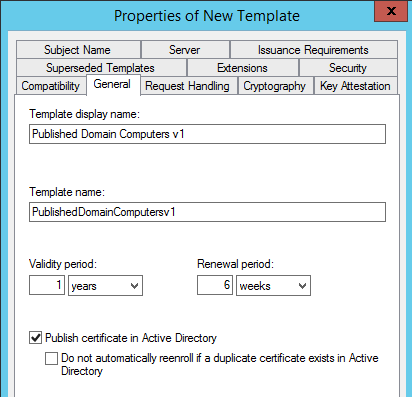
Ensure that the following properties have been updated:
- General Tab
- Validity Period
- Renewal Period
- Compatibility Tab > Compatibility Settings
- Certification Authority: Windows Server 2012 R2
- Certificate Recipient: The oldest operating system that would receive a certificate. Recommend Vista/Server 2008 +.
- Request Handling Tab (Optional)
- Allow private key to be exported (selected)
- Subject Name Tab > Build from this Active Directory information
- Subject Name Format: DNS name
- Include this information in alternate subject name: DNS name
- Issuance Requirements (Optional)
- CA certificate manager approval – This will require that a CA manager approve all requests. For all domain machines, this is likely not desired. This is likely only desired for specific types of certificates, such as Web Server certificates.
- Superseded Templates
- Certificate Templates: Computer
- This will state that the new template that we are creating is identified as the predecessor of Computer. This will give priority to this template.
- Security
- Domain Computers: Autoenroll = Allow
- NOTE: If the certificate template is for Domain Controllers, only allow the Domain Controllers group to Autoenroll.
Note: To Create a Remote Desktop Authentication Template:
- Duplicate the Published Domain Computers v1 template.
- Add the Remote Desktop Authentication Application Extension by:
- Extensions Tab
- Application Policies
- Edit
- Remote the Client and Server Authentication Extensions
- Select Add
- New
- Name: Remote Desktop Authentication
- Object Identifier: 1.3.6.1.4.1.311.54.1.2
- OK
- OK
- OK
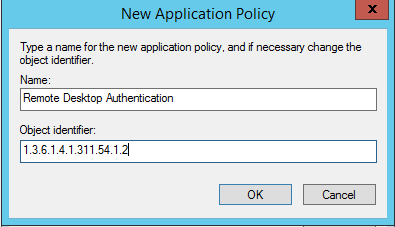
See the GPO requirements for this template in Step 5.
Note: For the Duplicate Web Server template:
- Ensure that the option to allow Export the Private Key is selected. This will ensure that the certificate can be used on Web Server Farms if desired.
- Ensure that the Subject Name is configured to Supply in the Request. Often web sites do not use the name of the server and therefore the requestor must submit the name.
- Ensure that CA certificate manager approval is required (Issuance Requirements Tab). This will ensure that web servers are not created and issued a certificate without proper authorization.
Once the template has been created, publish the certificate on the Certification Authority. Do this by right clicking Certificate Templates, select New then Certificate Template to Issue. Then select the template from the list.

Configure Domain for Certificate Auto-Enrollment via GPO
For this step, select a GPO to create/modify and add the following settings:
- Computer Configuration > Policies > Windows Settings > Security Settings > Public Key Policies
- Certificate Services Client – Auto-Enrollment
- Configuration Model: Enabled
- Select – Renew expired certificates, update pending certificates, and remove revoked certificates
- Select – Update certificates that use certificate templates
- Certificates Services Client – Certificate Enrollment Policy
- Configuration Model: Enabled
- Use the default of Active Directory Enrollment
- Certificate Services Client – Auto-Enrollment
GPO Requirements for Remote Desktop Authentication Template: To Ensure that a Remote Desktop Authentication Certificate is used, which is issued by the CA, configure the following policy setting:
- Computer Configuration > Policies > Administrative Templates > Remote Desktop Services > Remote Desktop Session Host > Security:
- Server Authentication Certificate Template: Remote Desktop Authentication Certificate Template Name
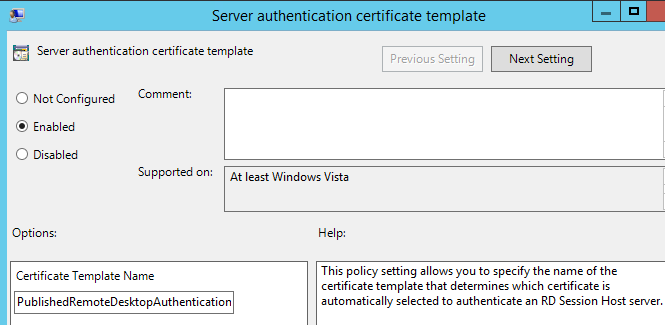
General Notes
On a server with Remote Desktop Connections allowed, run the following command to obtain which certificate is currently in use by the Remote Desktop Service:
Get-WmiObject -class “Win32_TSGeneralSetting” -Namespace root\cimv2\terminalservices -Filter “TerminalName=’RDP-tcp'”
Conclusion:
Congratulations! You’ve made it to the end of the guide. If you missed Part 1 or Part 2, make sure to check them out.
2 thoughts on “Windows Server 2016 Active Directory Certificate Services Lab Build – Part 3”
Comments are closed.